Setting up Dynmap for your Minecraft server allows you to view a live map of your world in your browser. It’s a great tool for server administration and gives your players an interactive way to explore the world online. Here’s how you can set it up:
Prerequisites:
- Minecraft Server: You must already have a Minecraft server set up, whether it’s a local server or a hosting service.
- Java: Ensure you have Java installed, as Dynmap requires it to run.
- Permissions: Make sure you have access to the server’s files (FTP or file manager).
Step-by-Step Guide:
1. Download Dynmap Plugin
- Go to the Dynmap page on Spigot or Dynmap for Bukkit to download the plugin.
- Choose the appropriate version for your server’s software (Spigot, Paper, Bukkit, etc.).
- Download the
.jarfile.
2. Install Dynmap on Your Server
- Navigate to the server’s plugins directory (for Spigot, Paper, or Bukkit servers).
- This is typically in
your_server_folder/plugins/.
- This is typically in
- Upload the downloaded
.jarfile into the plugins folder.
3. Restart the Server
- After uploading the Dynmap plugin, restart your Minecraft server.
- When the server starts, Dynmap will automatically generate its configuration files.
4. Configure Dynmap (Optional)
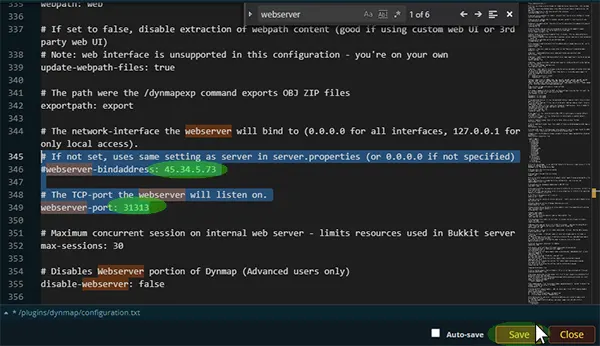
- Go to the
plugins/dynmap/folder. - Open the configuration.txt file to adjust settings (e.g., map rendering options, whether or not to display certain parts of the world, permissions).
- You can also configure the web server that serves the map (usually this will work out of the box, but you can tweak it if needed).
5. Accessing the Dynmap
- After the server is up and running, you can access your Dynmap by visiting the IP address of your server, followed by the port (default is 8123):
http://your_server_ip:8123
6. (Optional) Setting Up Dynmap for Public Access
- By default, Dynmap is available to anyone who has the server’s IP and port. However, you may want to limit access:
- If you want to password-protect the map, modify the
webserversettings inconfiguration.txt. - Alternatively, set up a reverse proxy through a web server (Apache/Nginx) to control access more securely.
- If you want to password-protect the map, modify the
7. (Optional) Customizing the Map
- Dynmap can show different world types, including overworld, nether, and end. You can enable or disable specific worlds, change the zoom levels, and tweak the style of the map from the configuration file.
- You can also change how the map displays (e.g., default “flat” map, or a 3D representation).
8. Rendering the Map
- Dynmap renders the map in the background, but you can manually trigger a full map render or refresh it using commands.
- Command:
/dynmap fullrender(renders the entire world). - To stop the render:
/dynmap stoprender.
- Command:
Troubleshooting:
- Port issues: Make sure your server’s port (default 8123) is open and accessible if you’re hosting the server publicly.
- Performance: Large worlds may cause slow rendering. Consider adjusting the render settings to make it less resource-heavy.
With this setup, you’ll be able to visualize your Minecraft world in real-time and give others the ability to explore it remotely.